Thursday, November 9, 2017

Ruby on Rails - Migrations

Rails Migration allows you to use Ruby to define changes to your database schema, making it possible to use a version control system to keep things synchronized with the actual code.
This has many uses, including −
  • Teams of developers − If one person makes a schema change, the other developers just need to update, and run "rake migrate".
  • Production servers − Run "rake migrate" when you roll out a new release to bring the database up to date as well.
  • Multiple machines − If you develop on both a desktop and a laptop, or in more than one location, migrations can help you keep them all synchronized.

What Can Rails Migration Do?

  • create_table(name, options)
  • drop_table(name)
  • rename_table(old_name, new_name)
  • add_column(table_name, column_name, type, options)
  • rename_column(table_name, column_name, new_column_name)
  • change_column(table_name, column_name, type, options)
  • remove_column(table_name, column_name)
  • add_index(table_name, column_name, index_type)
  • remove_index(table_name, column_name)
Migrations support all the basic data types − The following is the list of data types that migration supports −
  • string − for small data types such as a title.
  • text − for longer pieces of textual data, such as the description.
  • integer − for whole numbers.
  • float − for decimals.
  • datetime and timestamp − store the date and time into a column.
  • date and time − store either the date only or time only.
  • binary − for storing data such as images, audio, or movies.
  • Boolean − for storing true or false values.
Valid column options are − The following is the list of valid column options.
  • limit ( :limit => “50” )
  • default (:default => “blah” )
  • null (:null => false implies NOT NULL)
NOTE − The activities done by Rails Migration can be done using any front-end GUI or directly on SQL prompt, but Rails Migration makes all those activities very easy.
See the Rails API for details on these.

Create the Migrations

Here is the generic syntax for creating a migration −
application_dir> rails generate migration table_name
This will create the file db/migrate/001_table_name.rb. A migration file contains the basic Ruby syntax that describes the data structure of a database table.
NOTE − Before running the migration generator, it is recommended to clean the existing migrations generated by model generators.
We will create two migrations corresponding to our three tables − books and subjects.
Books migration should be as follows −
tp> cd library
library> rails generate migration books
Above command generates the following code.

Generate
subject migration should be as follows −
tp> cd library
library> rails generate migration subjects
Above command generates the following code.
Generate
Notice that you are using lower case for book and subject and plural form while creating migrations. This is a Rails paradigm that you should follow each time you create a Migration.

Edit the Code

Go to db/migrate subdirectory of your application and edit each file one by one using any simple text editor.
Modify 001_books.rb as follows −
The ID column will be created automatically, so don't do it here as well.
class Books < ActiveRecord::Migration
   
   def self.up
      create_table :books do |t|
         t.column :title, :string, :limit => 32, :null => false
         t.column :price, :float
         t.column :subject_id, :integer
         t.column :description, :text
         t.column :created_at, :timestamp
      end
   end

   def self.down
      drop_table :books
   end
end
The method self.up is used when migrating to a new version, self.down is used to roll back any changes if needed. At this moment, the above script will be used to create books table.
Modify 002_subjects.rb as follows −
class Subjects < ActiveRecord::Migration
   def self.up
      
      create_table :subjects do |t|
         t.column :name, :string
      end
 
      Subject.create :name => "Physics"
      Subject.create :name => "Mathematics"
      Subject.create :name => "Chemistry"
      Subject.create :name => "Psychology"
      Subject.create :name => "Geography"
   end

   def self.down
      drop_table :subjects
   end
end
The above script will be used to create subjects table and will create five records in the subjects table.

Run the Migration

Now that you have created all the required migration files. It is time to execute them against the database. To do this, go to a command prompt and go to the library directory in which the application is located, and then type rake migrate as follows −
library> rake db:migrate
This will create a "schema_info" table if it doesn't exist, which tracks the current version of the database - each new migration will be a new version, and any new migrations will be run until your database is at the current version.
Rake is a Ruby build program similar to Unix make program that Rails takes advantage of, to simplify the execution of complex tasks such as updating a database's structure etc.

Running Migrations for Production and Test Databases

If you would like to specify what Rails environment to use for the migration, use the RAILS_ENV shell variable.
For example −
library> export RAILS_ENV = production
library> rake db:migrate
library> export RAILS_ENV = test
library> rake db:migrate
library> export RAILS_ENV = development
library> rake db:migrate


Wednesday, November 8, 2017

Rails: Active Records

Rails Active Record is the Object/Relational Mapping (ORM) layer supplied with Rails. It closely follows the standard ORM model, which is as follows −
  • tables map to classes,
  • rows map to objects and
  • columns map to object attributes.
Rails Active Records provide an interface and binding between the tables in a relational database and the Ruby program code that manipulates database records. Ruby method names are automatically generated from the field names of database tables.
Each Active Record object has CRUD (Create, Read, Update, and Delete) methods for database access. This strategy allows simple designs and straight forward mappings between database tables and application objects.

Translating a Domain Model into SQL

Translating a domain model into SQL is generally straight forward, as long as you remember that you have to write Rails-friendly SQL. In practical terms, you have to follow certain rules −
  • Each entity (such as book) gets a table in the database named after it, but in the plural (books).
  • Each such entity-matching table has a field called id, which contains a unique integer for each record inserted into the table.
  • Given entity x and entity y, if entity y belongs to entity x, then table y has a field called x_id.
  • The bulk of the fields in any table store the values for that entity's simple properties (anything that's a number or a string).

Creating Active Record Files (Models)

To create the Active Record files for our entities for library application, introduced in the previous chapter, issue the following command from the top level of the application directory.
library\> rails script/generate model Book
library\> rails script/generate model Subject
Above rails generate model book commands generates the auto code as below −
Book Generate
You're telling the generator to create models called Book and Subject to store instances of books and subjects. Notice that you are capitalizing Book and Subject and using the singular form. This is a Rails paradigm that you should follow each time you create a model.
When you use the generate tool, Rails creates the actual model file that holds all the methods unique to the model and the business rules you define, a unit test file for performing test-driven development, a sample data file (called fixtures) to use with the unit tests, and a Rails migration that makes creating database tables and columns easy.
Apart from creating many other files and directories, this will create files named book.rb and subject.rb containing a skeleton definition in the app/models directory.
Content available in book.rb −
class Book < ActiveRecord::Base
end
Content available in subject.rb −
class Subject < ActiveRecord::Base
end

Creating Associations between Models

When you have more than one model in your rails application, you would need to create connection between those models. You can do this via associations. Active Record supports three types of associations −
  • one-to-one − A one-to-one relationship exists when one item has exactly one of another item. For example, a person has exactly one birthday or a dog has exactly one owner.
  • one-to-many − A one-to-many relationship exists when a single object can be a member of many other objects. For instance, one subject can have many books.
  • many-to-many − A many-to-many relationship exists when the first object is related to one or more of a second object, and the second object is related to one or many of the first object.
You indicate these associations by adding declarations to your models: has_one, has_many, belongs_to, and has_and_belongs_to_many.
Now, you need to tell Rails what relationships you want to establish within the library data system. To do so, modify book.rb and subject.rb to look like this −
class Book < ActiveRecord::Base
   belongs_to :subject
end
We have used a singular subject in the above example, because one Book can belong to a single Subject.
class Subject < ActiveRecord::Base
   has_many :books
end
We have used plural books here, because one subject can have multiple books.

Implementing Validations on Models

The implementation of validations is done in a Rails model. The data you are entering into the database is defined in the actual Rails model, so it only makes sense to define what valid data entails in the same location.
The validations are −
  • The value of title field should not be NULL.
  • The value of price field should be numeric.
Open book.rb in the app\model subdiractory and put the following validations −
class Book < ActiveRecord::Base
   belongs_to :subject
   validates_presence_of :title
   validates_numericality_of :price, :message=>"Error Message"
end
  • validates_presence_of − protects "NOT NULL" fields against missing user input.
  • validates_numericality_of − prevents the user, entering non numeric data.

Saturday, November 4, 2017

Database Setup Example

Before starting with this chapter, make sure your database server is up and running. Ruby on Rails recommends creating three databases - a database each for development, testing, and production environment. According to convention, their names should be −
  • library_development
  • library_production
  • library_test
You should initialize all three of them and create a user and password for them with full read and write privileges. We are using the root user ID for our application.

Database Setup for MySQL

In MySQL, we are using the root user ID for our application. The MySQL console session in which you do this looks something like −
mysql> create database library_development;
Query OK, 1 row affected (0.01 sec)

mysql> grant all privileges on library_development.*
to 'root'@'localhost' identified by 'password';
Query OK, 0 rows affected (0.00 sec)

mysql> FLUSH PRIVILEGES;
Query OK, 0 rows affected (0.00 sec)
You can do the same thing for two more databases library_production and library_test.

Configuring database.yml

At this point, you need to let Rails know about the user name and password for the databases. You do this in the file database.yml, available in the library\config subdirectory of Rails Application you created. This file has live configuration sections for MySQL databases. In each of the sections you use, you need to change the username and password lines to reflect the permissions on the databases you've created.
When you finish, it should look something like −
development:
   adapter: mysql
   database: library_development
   username: root
   password: [password]
   host: localhost
 
test:
   adapter: mysql
   database: library_test
   username: root
   password: [password]
   host: localhost
   
production:
   adapter: mysql
   database: library_production
   username: root
   password: [password]
   host: localhost

Database Setup for PostgreSQL

By default, PostgreSQL does not provide any users. We have to create new users. Use the following command to create a user with the name rubyuser.
tp> sudo -u postgres createuser rubyuser -s
If you want to create a password for the new user, then use the following command.
tp> sudo -u postgres psql

postgres=# \password rubyuser
Use the following command for creating a database library_development.
postgres=# CREATE DATABASE library_development OWNER rubyuser; 

CREATE DATABASE
Use the following command for creating a database library_production.
postgres=# CREATE DATABASE library_production OWNER rubyuser; 

CREATE DATABASE
Use the following command for creating a database library_test.
postgres=# CREATE DATABASE library_test OWNER rubyuser; 

CREATE DATABASE
Press Ctrl+D to terminate PosgreSQL.

Configuring database.yml

At this point, you need to let Rails know the username and password for the databases. You do this in the file database.yml, available in the library\config subdirectory of Rails Application you created. This file has live configuration sections for PostgreSQL databases. In each of the sections, you need to change the username and password lines to reflect the permissions on the databases you've created.
When you finish, it should look as follows −
default: &default
   adapter: postgresql
   encoding: unicode
  
development:
   adapter: postgresql
   encoding: unicode
   database: library_development
   username: rubyuser
   password: <Password for rubyuser>

test:
   adapter: postgresql
   encoding: unicode
   database: library_test
   username: rubyuser
   password: <Password for rubyuser>
 
production:
   adapter: postgresql
   encoding: unicode
   database: library_production
   username: rubyuser
   password: <Password for rubyuser>

How to Launch Web Server

In this chapter, we will create a simple but operational online library system for holding and managing the books.
This application has a basic architecture and will be built using two ActiveRecord models to describe the types of data that is stored −
  • Books, which describes an actual listing.
  • Subject, which is used to group books together.

Workflow for Creating Rails Applications

A recommended work flow for creating Rails Application is as follows −
  • Use the rails command to create the basic skeleton of the application.
  • Create a database on the PostgreSQL server to hold your data.
  • Configure the application to know where your database is located and the login credentials for it.
  • Create Rails Active Records (Models), because they are the business objects you'll be working with in your controllers.
  • Generate Migrations that simplify the creating and maintaining of database tables and columns.
  • Write Controller Code to put a life in your application.
  • Create Views to present your data through User Interface.
So, let us start with creating our library application.

Creating an Empty Rails Web Application

Rails is both a runtime web application framework and a set of helper scripts that automate many of the things you do when developing a web application. In this step, we will use one such helper script to create the entire directory structure and the initial set of files to start our Library System application.
  • Go into ruby installation directory to create your application.
  • Run the following command to create a skeleton for library application. It will create the directory structure in the current directory.
tp> rails new library
This will create a subdirectory for the library application containing a complete directory tree of folders and files for an empty Rails application. Check a complete directory structure of the application. Check Rails Directory Structure for more detail.
Most of our development work will be creating and editing files in the library/app subdirectories. Here's a quick run down of how to use them −
  • The controllers subdirectory is where Rails looks to find controller classes. A controller handles a web request from the user.
  • The views subdirectory holds the display templates to fill in with data from our application, convert to HTML, and return to the user's browser.
  • The models subdirectory holds the classes that model and wrap the data stored in our application's database. In most frameworks, this part of the application can grow pretty messy, tedious, verbose, and error-prone. Rails makes it dead simple.
  • The helpers subdirectory holds any helper classes used to assist the model, view, and controller classes. This helps to keep the model, view, and controller code small, focused, and uncluttered.

Starting Web Server

Rails web application can run under virtually any web server, but the most convenient way to develop a Rails web application is to use the built-in WEBrick web server. Let's start this web server and then browse to our empty library application −
This server will be started from the application directory as follows. It runs on port number 3000.
tp> cd ruby\library 
tp\ruby\library\> Rails server
It generates the auto code to start the server as shown below −
Rails Server
This will start your WEBrick web server.
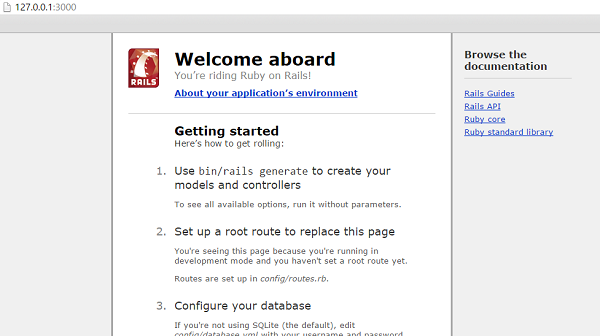
Now open your browser and browse to http://127.0.0.1:3000. If everything is gone fine, then you should see a greeting message from WEBrick, otherwise there is something wrong with your setting. If everything goes well it will generate the output as follows.
Web Server

Wednesday, November 1, 2017

Directory Structure

When you use the Rails helper script to create your application, it creates the entire directory structure for the application. Rails knows where to find things it needs within this structure, so you don't have to provide any input.
Here is a top-level view of a directory tree created by the helper script at the time of application creation. Except for minor changes between releases, every Rails project will have the same structure, with the same naming conventions. This consistency gives you a tremendous advantage; you can quickly move between Rails projects without relearning the project's organization.
To understand this directory structure, let's use the demo application created in the Installation chapter. It can be created using a simple helper command rails demo.
Now, go into the demo application root directory as follows −
tp> cd demo
demo> dir
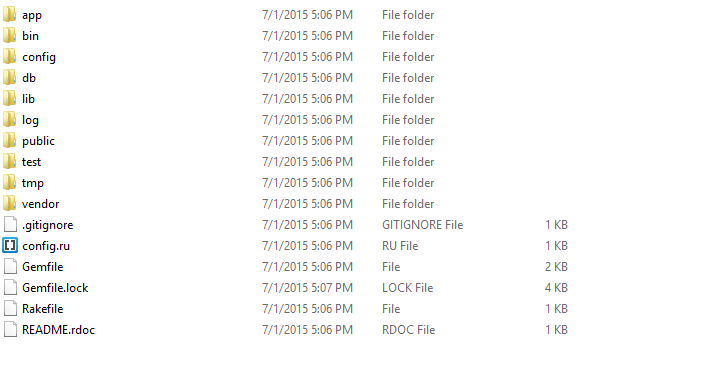
You will find a directory structure in Windows as follows −
Directory
Now let's explain the purpose of each directory
  • app − It organizes your application components. It's got subdirectories that hold the view (views and helpers), controller (controllers), and the backend business logic (models).
  • app/controllers − The controllers subdirectory is where Rails looks to find the controller classes. A controller handles a web request from the user.
  • app/helpers − The helpers subdirectory holds any helper classes used to assist the model, view, and controller classes. This helps to keep the model, view, and controller code small, focused, and uncluttered.
  • app/models − The models subdirectory holds the classes that model and wrap the data stored in our application's database. In most frameworks, this part of the application can grow pretty messy, tedious, verbose, and error-prone. Rails makes it dead simple!
  • app/view − The views subdirectory holds the display templates to fill in with data from our application, convert to HTML, and return to the user's browser.
  • app/view/layouts − Holds the template files for layouts to be used with views. This models the common header/footer method of wrapping views. In your views, define a layout using the <tt>layout:default</tt> and create a file named default.html.erb. Inside default.html.erb, call <% yield %> to render the view using this layout.
  • components − This directory holds components, tiny self-contained applications that bundle model, view, and controller.
  • config − This directory contains the small amount of configuration code that your application will need, including your database configuration (in database.yml), your Rails environment structure (environment.rb), and routing of incoming web requests (routes.rb). You can also tailor the behavior of the three Rails environments for test, development, and deployment with files found in the environments directory.
  • db − Usually, your Rails application will have model objects that access relational database tables. You can manage the relational database with scripts you create and place in this directory.
  • doc − Ruby has a framework, called RubyDoc, that can automatically generate documentation for code you create. You can assist RubyDoc with comments in your code. This directory holds all the RubyDoc-generated Rails and application documentation.
  • lib − You'll put libraries here, unless they explicitly belong elsewhere (such as vendor libraries).
  • log − Error logs go here. Rails creates scripts that help you manage various error logs. You'll find separate logs for the server (server.log) and each Rails environment (development.log, test.log, and production.log).
  • public − Like the public directory for a web server, this directory has web files that don't change, such as JavaScript files (public/javascripts), graphics (public/images), stylesheets (public/stylesheets), and HTML files (public).
  • script − This directory holds scripts to launch and manage the various tools that you'll use with Rails. For example, there are scripts to generate code (generate) and launch the web server (server).
  • test − The tests you write and those that Rails creates for you, all goes here. You'll see a subdirectory for mocks (mocks), unit tests (unit), fixtures (fixtures), and functional tests (functional).
  • tmp − Rails uses this directory to hold temporary files for intermediate processing.
  • vendor − Libraries provided by third-party vendors (such as security libraries or database utilities beyond the basic Rails distribution) go here.
Apart from these directories, there will be two files available in demo directory.
  • README − This file contains a basic detail about Rail Application and description of the directory structure explained above.
  • Rakefile − This file is similar to Unix Makefile, which helps with building, packaging and testing the Rails code. This will be used by rake utility supplied along with the Ruby installation.